Halaman

Kamis, 29 Maret 2012

Win7: Virus cause the folders to be hidden

Yep, a virus attacked my USB drive, it hide the folders, and replace them to a link which execute the naughty virus, using AV program, i manage to clean the virus, now the problem would be removing hidden attribute on the hidden folder..

I manage to enter the hidden folder using the path, but right-clicking and entering the properties doesn't allow me to change the hidden attribute for the folder

Fortunately, i come across this post here is a step by step guide :

  1. Open your command prompt, enter your path, as for my case it's H:
  2. run the command "attrib /s /d -r -s -h" without the double quotes
  3. wait for it..
A little explanation from the original author :
  • /s apply the command to all files
  • /d apply the command to all folders
  • -h will clear the hidden attribute
  • -s will clear the system file attribute
  • -r will clear the read only attribute
Hope this helps someone ;)

Rabu, 28 Maret 2012

c++: Boost "Bind" and "Functions" snippet

This is a personal note on using the boost library, since i come from a Delphi background, been trying to figure out the callback method which is simple to use in c++.. and then i come across useful boost library functions.. well the code should tell you more.. so here is the snippet :
//Using bind with Boost.Function
class button
{
public:

    boost::function onClick;
};

class player
{
public:

    void play();
    void stop();
};

button playButton, stopButton;
player thePlayer;

void connect()
{
    playButton.onClick = boost::bind(&player::play, &thePlayer);
    stopButton.onClick = boost::bind(&player::stop, &thePlayer);
}

pretty neat doesn't it? :)

Selasa, 27 Maret 2012

3d: Rotations, Axes, Local Space, Parent Space, World Space

The biggest factor i need to overcome with 3d programming was the math-side of 3d programming, there are many terms, such as vector, matrix, gimbals, local space, world space, projections, quaternions, euclidean, eulers etc.. We need to understand those terms so that i could position my objects correctly

If you are like me, you will be thrilled to read this page : opengl transforms, great article, made me understand the concept of local space and the world space

If you work with 3dsmax, blender, autocad, lightwave, etc you will likely works with axes, you use this axes to translate, rotate, scale your models, even per-element base(vertices, faces, polygons, edges).

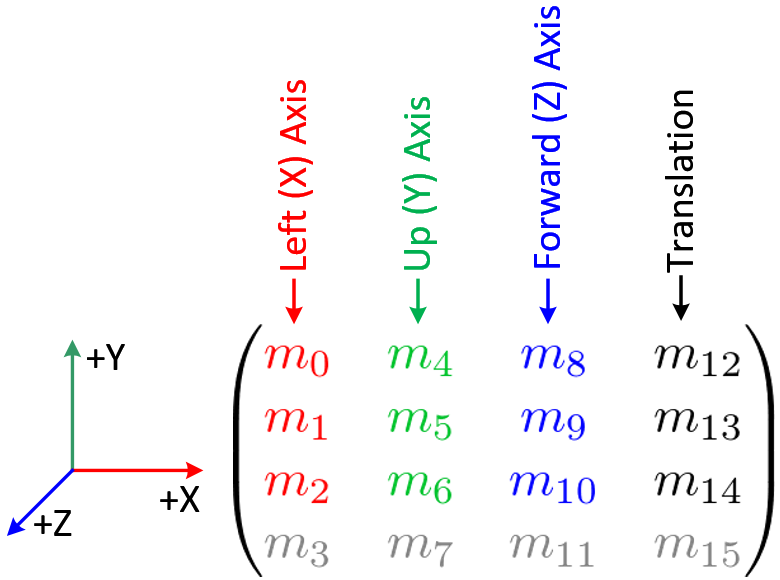
There is a concept which helps me a lot to program transformation, and that is the local axes, the forward, up, and left axes which is locally for our object. If you put your matrix data using OpenGL conventions (column major) and you save your transformation to your object, then the elements :

  • local-x (default 1,0,0) would be (m0, m1, m2) 
  • local-y (default 0,1,0) would be (m4, m5, m6)
  • local-z (default 0,0,1) would be (m8, m9, m10)
  • and your object translation would be (m12, m13, m14)

But remember this matrix represents your modelview (that is your model matrix * view matrix)
okayh, now, what is this model matrix, and view matrix?

Rabu, 21 Maret 2012

Cygwin Note: Accessing your local drive

cygwin is a project where you will feel the linux-like environment, you could compile using makefiles using the command make..

This is a note to my self, to access your drive, type cd cygdrive/e/...
nice..

Minggu, 18 Maret 2012

ProtonSDK: Having trouble with the 2d coordinates?

Err.. this post would be some kind of my own personal notes..

I had trouble tracking the TouchHandler component, there's something that i could not understand, why does when we setup the screen to become 320(width) * 420(height) - in pixels, when i click on the bottom of the screen, the point interpreted by TouchHandler component is larger than 420..

Tracking through the source code, i found that we should be cautious when choosing the video mode, locked landscape, setup fake screen procedures

You could trace that problem on file "RenderUtils.cpp" the procedure "ConvertCoordinatesIfRequired" .. this would be a good place for your breakpoints :)

You haven't tried ProtonSDK? developed by Seth. A. Robinson - www.protonsdk.com try them! they are free and powerful!

If you stumbled across problems, there is the IRC channel, and the forum.. the creator (Seth) actively maintains and answer your question..

Kudos to you Seth! ;)

Owkayh.. untill next time

Senin, 12 Maret 2012

Exporting Blender file(Collada) for Irrlicht

I'm using the built-in Collada exporter for the time being, and i have never face any trouble of doing so

For those of you who are like me, which is a beginner to blender, this guide might help you a bit :)
  1. When you export a model and load it from your Irrlicht Project, but it did not show the dimension (width, height, length bounding box aabb) which you designed, go back to blender, try to open up the transform panel (using the n key on your blender's 3d view), check if you have a rotation / scale which is applied at the object level? if yes,press ctrl+a and apply those transformation
  2. Dunno if i'm doing this right, but to compose your scene, you need to benchmark / do a repeat trial to compose(positioning, scaling, targeting) your scene, your camera, etc 
  3. You need to assign material(s) and texture(s) if you need to colorize / make something out of that 'clay' look.. 
There is this one thread which gives a good general guideline exporting your 3d model to irrlicht.. i think i had it..

ah yes, here it is :

**** Source : Irrlicht Forum

posted by Mel :

Basically, whatever you export from 3DSMAX (it may be extended to other software as well):
  • It should be either an editable mesh or editable poly without modifiers. You should collapse the stack of modifiers. At most, the only modifier supported is the skin modifier, for skinned objects. 
  • It should be a single object, as it will be loaded as a single object by the engine. For instance, the wheels and the body of a car should be 2 different exported objects. 
  • place the object, so its pivot is on the origin of coordinates. Again, to export a wheel correctly, it should have the origin of coordinates at the center. 
  • Use at most 2 channels of UVW mapping coordinates, and make sure that the exporter will write both correctly. For this is good that you understand how to use the unwrap uvw modifier. And for most models, use just one channel of mapping coordinates, The usage of 2 channels is more for the stage models. 
  • Vertex colors are supported by irrlicht, and they help a lot, learn how to use the vertex paint utilities. -Use square textures with power of 2 resolutions, or at least, textures whose dimensions are power of 2. (1024x1024, 512x1024, 64x256...) 
  • Use the least material ID's posible, those translate almost directly into meshbuffers, you want to have the least meshbuffers posible. -
  • Skinned objects are supported, Use Skin instead of Physique, not that physique won't work, but the Skin modifier behaves closer to what Irrlicht does. And export just a single skinned mesh. Irrlicht only supports displacement mapping via geometry shaders, and those are only supported in Open GL,discard the modifier or collapse the mesh, and export the high resolution object. 
And that more or less, sums up all the precautions you should take when exporting models from max or other packages.

********** Ent of Message *********

Hmm.. do i need to add something more.. i will post when found something useful hehehe that's a promise.. i guess.. Err... i wanted to make a game, yet i stumbled learning things, let's enjoy the ride shall we?

Jumat, 24 Februari 2012

Bermain dengan Irrlicht 1.71, Blender 2.6x = Game 3D

Akhirnya, sya mulai merujuk pada game 3d, setidaknya mulai untuk bermain-main dengan coding 3d.
  1. Sebagai engine playground saya, saya memilih irrlicht 1.71 
  2. Untuk mengenal tentang transformasi, maupun pergerakan dalam dunia 3d, saya memilih menggunakan Blender 2.62 sebab kebenaran.. tutorial yang banyak saya temukan adalah tutorial untuk blender.. dan ada satu proyek add-on "irrb 0.6" yang bisa meng-export dari blender ke file "irr"
Beberapa istilah :
  • Irr merupakan file yang berisi layouting dari object-object untuk game yang kita rancang
  • Irrmesh merupakan file xml berbentuk text yang mendefinisikan suatu benda (mesh, cube, sphere, dst)
  • Irrbmesh, sama dengan irrmesh, hanya bentuknya adalah binary, menurut sang pembuat library ini, loading time irrbmesh dibanding dengan yang lain adalah yang paling cepat.. konon katanya demikian :)
Ok, untuk post ke depan, mungkin saya akan mulai posting tentang game programming (yep, my passion..) untuk bisa game programming ada baiknya kita menguasai dulu editor 3d, setidaknya menguasai basic dari editor yang kita pilih, untuk mengenal apa itu vertex, vertices, cull, depth of field, face, edge, concave, polygon, normals, vectors, global coordinate, local coordinate, physics, soft body, rigid, static, dand seterusnya.. untungnya mas brow.. :) ini semua bisa kita temukan di software tangguh nan open-source bernama blender, dan blender yang saya gunakan adalah versi 2.62 dan sesuatu yang bisa di kagumi, renderer engine codename : cycles (bila dipergunakan dengan baik dan benar) akan memberikan suatu hasil yang fantastis gituu.. reality..

Dibawah ini adalah skill2 dasar yang saya kejar sebagai arsenal untuk 3d game programming

Minggu, 06 November 2011

ubuntu: Installing php apache mysql

Steps to install the webserver to your ubuntu ;)
  1. sudo apt-get install apache2
  2. sudo apt-get install mysql-server
  3. sudo apt-get install php5-mysql
  4. sudo /etc/init.d/apache2
  5. gksudo gedit /etc/apache2/httpd.conf
    insert this line(without the quotes) : "ServerName localhost"
  6. sudo apt-get install phpmyadmin
  7. If you do not specify password for your mysql installation, you need to modify the phpmyadmin config file. open gedit and edit the phpmyadmin configuration file "/etc/phpmyadmin/config.inc.php" and uncomment those line similar to this one :
    $cfg['Servers'][$i]['AllowNoPassword'] = TRUE;
Testing :
open firefox and type this address : http://localhost/phpmyadmin

Well done and congratulation, you basic server (local) configuration is ready! ;)

basic information :
your local website storage located in "/var/www" if you would like to configure for other location, you should do it within the apache virtual hosts.. and that's another topics i will try to cover next time..

Rabu, 02 November 2011

Packet Sniffer

When you are working with the internet / network, you need to make sure that the packet you sent/receive is what you are planning to get / send

This open source packet sniffer is a very great project. It could even sniff your password when you even though you send them using ssl/encryptions

Here is the link to that wonderfull project : http://code.google.com/p/ospy/

Very nice!!

Rabu, 26 Oktober 2011

Delphi : Working with path, file name, directory

From time to time, you would need file manipulations integrated with your software(s), and you usually needs the library for working with your directory, these are couples of directory routines which is very much usefull

  1. ExtractFilePath : this will returns the directory for a file, including a backslash("\" ~ Env. Windows) 
  2. ExpandFileName: Example : "c:\program files\yohan\is\cool\..\.." will returns "c:\program files\yohan\"
Two very handy functions! :)

Kamis, 20 Oktober 2011

Share : Palm Pre as a USB modem

Have the usb cable? have the data plan? have the thing to try out your palm pre as a modem? fear not as webosinternals once again provide us with the most sophisticated solution for Free, "Tethering" your palm pre as a modem..

you could tether using Wifi, Bluetooth, even USB connection..

without further ado.. let's get some do.., here is what you need to do..
cool rhyme isn't it? hehehe

  1. Download your driver, you could download it here.. (64bit driver) or (32bit driver)
    note : after you downloaded the file, remove the txt extension from the downloaded file
  2. Download FreeTether (look for it on preware, or using your webosquickinstall 4.x) or better yet, using google ;)
  3. Now plug your pre to the computer
  4. Open and run FreeTether, turn on the USB tethering
  5. Go to your windows device manager, look for the device.. something called "RNDIS gadget" with an exclamation mark on it's side
  6. Update your driver, navigate to where you store your download( ~ step 1 )
  7. Choose to manually look and install your driver
  8. After you install the driver, windows will automatically detected new network and tries to connect with it
  9. Wait for it..
  10. Enjoy surfing the internet :)
Have a great and blessed day everyone!

Selasa, 11 Oktober 2011

Sabtu, 24 September 2011

Delphi:runtime TDBGrid change default row height

type
  TyourHackGrid = class(TDBGrid);

TyourHackGrid(yourDBGrid).RowHeights[0] := 50;
Nice indeed ;)

Delphi : Load png to TBitmap

HI there good friends, for those of you who would like to get load a jpeg image and then load the data to a TBitmap object, here is a neat good trick to get it done :

procedure TForm1.btn1Click(Sender: TObject);
var
	bmp : TBitmap;
begin
    if(dlgOpenPic1.Execute()) then
    begin
        img1.Picture.LoadFromFile(dlgOpenPic1.FileName);

        bmp := TBitmap.Create;
        try
            bmp.Width := img1.Picture.Width;
            bmp.Height := img1.Picture.Height;

            bmp.Canvas.Draw(0, 0, img1.Picture.Graphic);

            Canvas.Draw(btn1.Left, btn1.Top + btn1.Height + 20, bmp);
        finally
            bmp.Free;
        end;
    end;
end;
Just dont forget to include the jpeg unit if you want to work with the jpegs, and for delphi 2009 and up you could add the PNGImage to work with png files on your delphi project

Have fun dear friends! ;)

Jumat, 23 September 2011

Playing with linux

Downloading file : use wget http://blabla.com/bla.zip
working with a tar.gz : tar -zxvf arcieve.tar.gz

since i like to play with installing the development.. this will include the header file XLib.h, XUtil.h
apt-get install xorg-dev

finding some file?
find / -name filename.ext -print

Rabu, 14 September 2011

WEBOS : Google map doesn't recognize your location?

A simple solution to that but might be not permanent is because of the latitude mode problem on the native google map application, me too had those similar problem, and browsing the web give me one solution that worked like charm ;)

Open your browser, clear your cache
hen go to the following address : http://maps.google.com/maps/m?mode=latitude


Google map application will open automaticly
and voila..
we had our location detected flawlessly.


Hints for the geek :
our palm pre phone is very much capable of the gps
try running this..
##DEBUG and you will find numerous wonderfull information there :)


Nice..


I love this phone..

Kamis, 25 Agustus 2011

Delphi : Variable Parameters, Packed Records

Variable Parameters
taken from www.chami.com
//
// FunctionWithVarArgs()
//
// skeleton for a function that
// can accept vairable number of
// multi-type variables
//
// here are some examples on how
// to call this function:
//
// FunctionWithVarArgs(
//   [ 1, True, 3, '5', '0' ] );
//
// FunctionWithVarArgs(
//   [ 'one', 5 ] );
//
// FunctionWithVarArgs( [] );
//
procedure FunctionWithVarArgs(
  const ArgsList : array of const );
var
  ArgsListTyped :
    array[0..$FFF0 div SizeOf(TVarRec)]
      of TVarRec absolute ArgsList;
  n         : integer;
begin
  for n := Low( ArgsList ) to
           High( ArgsList ) do
  begin
    with ArgsListTyped[ n ] do
    begin
      case VType of
        vtInteger   : begin
          {handle VInteger here}      end;
        vtBoolean   : begin
          {handle VBoolean here}      end;
        vtChar      : begin
          {handle VChar here}         end;
        vtExtended  : begin
          {handle VExtended here}     end;
        vtString    : begin
          {handle VString here}       end;
        vtPointer   : begin
          {handle VPointer here}      end;
        vtPChar     : begin
          {handle VPChar here}        end;
        vtObject    : begin
          {handle VObject here}       end;
        vtClass     : begin
          {handle VClass here}        end;
        vtWideChar  : begin
          {handle VWideChar here}     end;
        vtPWideChar : begin
          {handle VPWideChar here}    end;
        vtAnsiString: begin
          {handle VAnsiString here}   end;
        vtCurrency  : begin
          {handle VCurrency here}     end;
        vtVariant   : begin
          {handle VVariant here}      end;
        else          begin
          {handle unknown type here} end;
      end;
    end;
  end;
end;
Packed Records
Packed records is a way to align Delphi records. Delphi variables usually aligned at 2, 4, or 8 byte to optimize access, to make things clear, take a look at following code (taken from delphibasic.co.uk)
type
  // Declare an unpacked record
  TDefaultRecord = Record
    name1   : string[4];
    floater : single;
    name2   : char;
    int     : Integer;
  end;

  // Declare a packed record
  TPackedRecord = Packed Record
    name1   : string[4];
    floater : single;
    name2   : char;
    int     : Integer;
  end;

var
  defaultRec : TDefaultRecord;
  packedRec  : TPackedRecord;

begin
  ShowMessage('Default record size = '+IntToStr(SizeOf(defaultRec)));
  ShowMessage('Packed record size = '+IntToStr(SizeOf(packedRec)));
end;
there is more advanced usage for the record type of delphi, such as this one :
type 
   TRect = packed record
     case Integer of
       0: (Left, Top, Right, Bottom: Integer);
       1: (TopLeft, BottomRight: TPoint);
   end; 
TRect.TopLeft will map to the TRect.Left and TRect.Top, TRect.BottomRight will map to the TRect.Right and TRect.Bottom, anoher usage would be like this one :
type
   // Declare a fruit record using case to choose the
   // diameter of a round fruit, or length and height ohterwise.
   TFruit = Record
     name : string[20];
     Case isRound : Boolean of // Choose how to map the next section
       True  :
         (diameter : Single);  // Maps to same storage as length
       False :
         (length   : Single;   // Maps to same storage as diameter
          width    : Single);
   end;
when isRound is true, you could define 1 more variable, and that is the diameter:Single, and if isRound is false, you could define 2 more variable, that is length, and width

Sabtu, 20 Agustus 2011

Ubuntu : Adding new harddisk

First we need to list our hardware, is it detected yet by ubuntu? by using this command :
sudo lshw -C disk


make note of where your disk is, for example /dev/sdb


if you have gparted, then you got your self a rich partition manager, just go and choose your hardware (/dev/sdb in my example) and then new and then partition that disk

if you are using command line then there is the fdisk command

now to mount the device, simply create a new folder on your /media folder for the mount point example :
sudo mkdir /media/my_new_hd


and then to actualy mount it to the system :
sudo mount /dev/sdb /media/my_new_hd

now browse and get wild with nautilus

ah yes, to automatically mount the new HD, add the new hd to your your /etc/fstab file to something similar like this one liner :
/dev/sdb1 /media/mynewdrive ext3 defaults 0 2


**to launch editor, use sudo gedit /etc/fstab


I think i'm in love with ubuntu.. :D
unfortunately delphi is not there..
the games is not there..
but there is always lazarus ;)

ah yes, i currently running ubuntu 8.04, old i know, but that the only CD i had :D it's adequate for me to play aground with this powerful opensource OS

Have Fun everyone!

Solving Problem : using putty, connecting to Amazon EC2

There is a trick if your pem file converted to ppk (putty's private key) and the server respond is :
Server do not accept our key or something similar like that, server send public key etc..

On one blog i find that we need to open the pem file on a notepad and then add one line to the last line, so make sure you get your cursor under those texts..

One line is enough ;)

Now get to putty again, (i'm using ubuntu) so when the putty ask :"Login As" i answered Ubuntu and voila.. we get our self a great powerful cloud server

Kamis, 18 Agustus 2011

Playing with ubuntu

Playing with ubuntu fresh install, my target is to install indefero, mercurial to a vps, so i practice it using a virtual box.
the following is the commands for editing creating renaming file directory install etc, including installing the lamp and the pluf :)

  1. To rename dir or rename file using ubuntu comand line : mv
  2. To download file wget http://...
  3. To become a super user : sudo bash...
  4. To launch explorer along as super user : gksudo nautilus
  5. To restart apache : sudo /etc/init.d/apache2 restart
  6. To install sudo apt-get install package
  7. To upgrade apt : sudo apt-get upgrade
Ah yes, there are many more to explore!